Lab: Salmon Gravlax

Salmon Gravlax

Salt curing has been used for centuries to preserve fish caught at sea. It’s also easy to do at home! Surrounding fish with a sufficient quantity of salt draws out the moisture; this is called dry brining. But salt doesn’t just dry out the food (along with any bacteria and parasites). At sufficient concentration, dry brining actively disrupts a cell’s ability to function and kills it, rendering bacteria and parasites nonviable.

In a bowl, mix together:
     5 teaspoons (30g) kosher salt
     1 tablespoon (12g) sugar
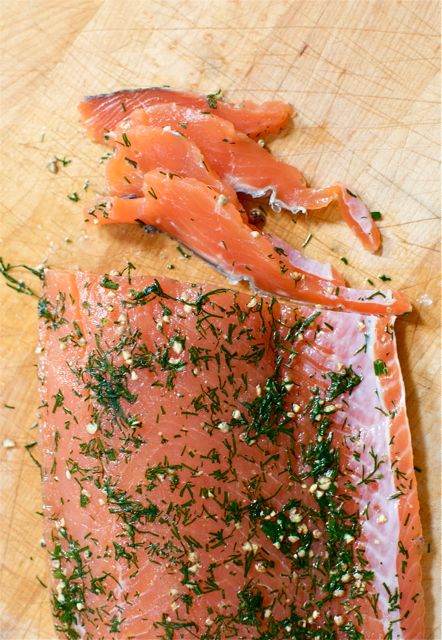
     3 tablespoons (12g) finely chopped fresh dill
     1 teaspoon (5 mL) vodka
     1 teaspoon (2g) crushed peppercorns (ideally, use a mortar and pestle)
On a large piece of plastic wrap, place:
     1 pound (450g) salmon, washed and bones removed; preferably a center cut so that its shape is rectangular
Sprinkle the salt mixture over the fish and massage it in. Wrap the fish in plastic and store it in the fridge, flipping and massaging it twice a day for a day or two.
Store it in the fridge and consume within a week.
Remove the skin from your salmon fillet.
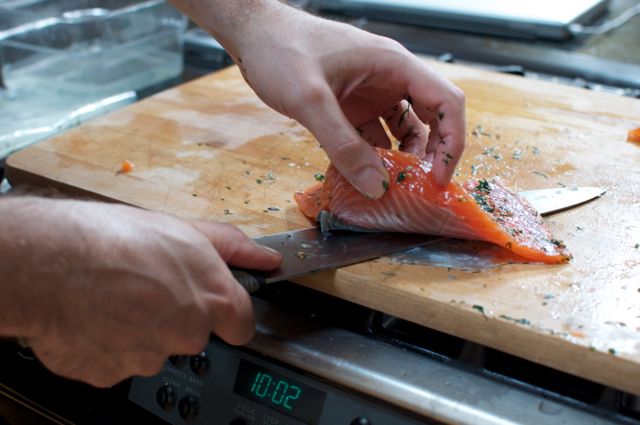
Remove the skin by placing the fish skin-side-down on a cutting board and carefully running a knife along the surface between the skin and flesh while using your hand to keep the fish from sliding around.
Notes
     • Vodka is used here as a solvent to dissolve some of the non-water-soluble aromatic compounds. You can substitute other spirits, such as cognac or whiskey, to bring additional flavors in. And in place of dill, try using coriander seed, loose tea leaves (e.g., Earl Grey or Lapsang Souchong), shallots, or lemon zest. The Scandinavians traditionally serve salmon gravlax on top of bread with a mustard dill sauce.
      • You can substitute other fatty fish, such as tuna, for the salmon and obtain a similar texture.
     • This recipe is a bit heavy on the salt—6% by weight—to err on the side of safety. You can reduce the saltiness before eating the fish by rinsing the finished product in fresh water. Curing above 3.5% salt prevents most common bacterial growth, but not all. Modest concentrations of salt prevent Gram-negative bacteria—which are the most common ones found in food—from growing, but won’t handle the few that are Gram-positive, such as Listeria.
     • Salt curing—as is done in salmon gravlax— is the first step in making lox. After curing, lox is also cold-smoked, which is the process of exposing a food to smoke vapors that have been cooled down. You can approximate the flavor of lox by adding liquid smoke to the rub.

The Sweet Way To Calibrate Your Oven

What if you don’t have a digital thermometer and need to check an oven? It’s common practice to calibrate thermometers with ice water and boiling water because those have temperatures based on the physical properties of water. Water isn’t the only chemical in the kitchen with known temperature dependent properties, though: you can also calibrate your oven’s thermometer using sugar!
Mankind has been harvesting sugar for millennia, but only in the past few hundred years have we industrialized it. The sugar you buy most likely comes from either the sugarcane or sugar beet plant, which is soaked in hot water to dissolve out its sugar into a syrup that’s then crystallized. The white table sugar that you’re familiar with is ~99% sucrose—a pure substance (C12H22O11)—with the rest being water and a tiny percentage of stuff like trace minerals and ash that come along for the ride.
First, grab these supplies:
• Aluminum foil
• Sugar
• A timer
• A plate (for hot sugar samples)
• And, obviously, an oven!
Here’s what to do:
The sucrose in table sugar melts at 367°F / 186°C. It turns from the familiar white granulated substance to something resembling glass. (Sucrose undergoes a chemical breakdown at low temperatures; see page 221.) A properly calibrated oven won’t melt sugar when set to 350°F / 180°C but it will when set to 375°F / 190°C.
We’re going to bake two different samples of sugar at two different temperatures, one hopefully below and the other above sugar’s melting point, to check your oven’s temperature.
1. Preheat your oven to 350°F / 180°C.
2. Make two aluminum foil “sample containers”:
     a) Tear the aluminum foil into 5” × 5” (12 cm × 12 cm) squares.
     b) Fold the edges of each piece up, making a miniature pan that’s about 4” / 10      cm square and ½”/ 1 cm high.
3. Add a spoonful of sugar into each sample container.
4. Put the first sample container in the preheated oven (350°F / 180°C). Set a timer for 20 minutes and wait.
5. After 20 minutes, remove the first sample and transfer it to your plate. Remember, the sugar is hot, even if it doesn’t look it!
6. Set your oven to 375°F / 190°C and wait 10 minutes for it to adjust.
7. Put the second sample container in the oven. Set a timer for 20 minutes and wait.
8. After 20 minutes, remove the second sample and transfer it to your plate.
Investigation time!
What differences do you see between the two samples? Why do you think that happened? Compare the 350°F / 177°C sample with some uncooked sugar; what do you notice? Why might that be happening? And the best part of the investigation: once the samples have cooled down, taste them! What does the 375°F / 190°C sample remind you of?
Sugar at 350°F / 177°C. Sugar at 375°F / 190°C.
Check back soon for my next post: How To Cook A High Heat Pizza

Ingredient Labels—Watch Out for This One Trick!

I wrote this up a few years ago but let it languish in my “thoughts” pile—clicking the “publish” button at last. Following up on yesterday’s comments about the US FDA’s proposal to change the food label by adding “added sugars” with a percent daily value is this below gem. I’m not sure it’s going to make much of a difference, although it’s a step in the right direction.

Naked Juice makes a “green machine” drink with “10 green turbo-nutrients”. Take a look at this screen grab of “the boost inside” a bottle—notice anything?

Hint: the qualities of the ingredients are given in mg. Not grams, but milligrams. 100 mg of broccoli = 0.1 g of broccoli.

Here is what 100 mg of broccoli looks like:

Screen Shot 2015-11-11 at 11.22.21 AM

This can’t really be right, can it?

Emails to Naked Juice below.

Hi, I purchased a bottle of ”Green Machine” today and was wondering about the ingredients used in it. On the back side of the label, it says the quantities of fruits and ”boosts” inside, such as 100mg of broccoli. Is that 100mg of straight-up, good ol’ fashioned broccoli, or 100mg of some sort of extract or flavor? Thanks!


Thanks for your inquiry about broccoli in Green Machine. The broccoli boost is from broccoli and is not a natural flavor extracted from broccoli.

We appreciate your business, Jeff, and I hope this information is helpful.

Theresa
Naked Juice Consumer Relations


Thanks for your reply! So to confirm, when the label says “50mg parsley”, that means there’s literally 50 mg of parsley in the bottle?


Thanks for your inquiry about the Green Machine label meaning that there are literally 50 mgs. of parsley in the bottle .

Yes, that’s correct! We follow all FDA labeling regulations and as you can see by the ingredients list, parsley and broccoli are actual ingredients in the Green Machine.


Sigh.

What am I missing?

Overclocked Ovens

[flickr size=”medium” float=”center”]3992411629[/flickr]
PyroCeram on the left; HB II glass (“heat barrier II” – glass treated with a IR reflective coating) on the right.

I am now the proud owner of one tricked-out oven. Some tinkering with the lock mechanism, a hundred bucks and one sheet of PyroCeram later, and my oven now reaches a blistering 900F.

Why would I want to take my oven to 900F? To make the perfect pizza! I had a fantastic phone interview yesterday with a geek-turned-chef, Jeff Varasano, who’s thought about pizza way more than anyone else this side of the Atlantic. Take a look at his extensive write-up to get an idea of what I mean by “extensive”: www.varasanos.com/PizzaRecipe.htm

Oh, and if you’re wondering “What’s PyroCeram?” — it’s a high-heat, thermal-shock resistant glass-like substance that was used in the 50’s to coat missile nosecones and is now used for industrial furnace “view panels”. It’s rated to 1400F, unlike the “normal” glass used (HBII – “heat barrier II” – IR reflective coating), so shouldn’t crack or break in my oven. In testing the “perfect” pizza recipe, I “broke” the glass in my oven door: thermal shock from cold air (or a drop of cold tomato sauce?) hitting it while the oven was at 900F. Definitely not covered by the manufacturer’s warranty.

[flickr-gallery mode=”photoset” photoset=”72157622542497546″]

Making Yogurt

One of the fun things about working on the book is the “need” to test everything. I say “need” because, in truth, it’s a lot of fun to geek out over the details and try more permutations than I might otherwise try. (Just like a good coder, gotta try to hit the boundary conditions in writing recipes!)

Yogurt is really way easier to make than I thought: toss a spoon of yogurt into a container of milk and let it sit long enough in a warm environment, and the bacteria from the yogurt (needs to be “live culture”) will chow down on the lactose in the milk. My oven hovers around 110 F when the oven light is on (it probably helps that it’s 9 billion degrees outside right now) – easier than pie.

There are some precautions you should take to avoid culturing the wrong kind of bacteria, so if you want to be thorough, you should do a bit more than “just” toss milk+yogurt into the oven. For a good write-up, see extension.missouri.edu/publications/DisplayPub.aspx?P=GH1183.

[flickr-gallery mode=”photoset” photoset=”72157622356425792″]

Storage Tips: Spices

I spend a lot of time thinking about clever ways to save time by cutting out steps (literally) in the kitchen: storing the garlic press with the garlic, tea pots next to the tea, etc.

My friend Paula stores her spices in a drawer where she can see the labels at one glance. It’s a subtle change from the standard spice rack or “shelf of bottles” approach, but having tried it myself now, I really like it. I find it makes finding what I’m looking for much easier – and faster – especially since I have a pretty large collection of spices.

How do you organize your spices?

[flickr-gallery mode=”photoset” photoset=”72157622267405635″]